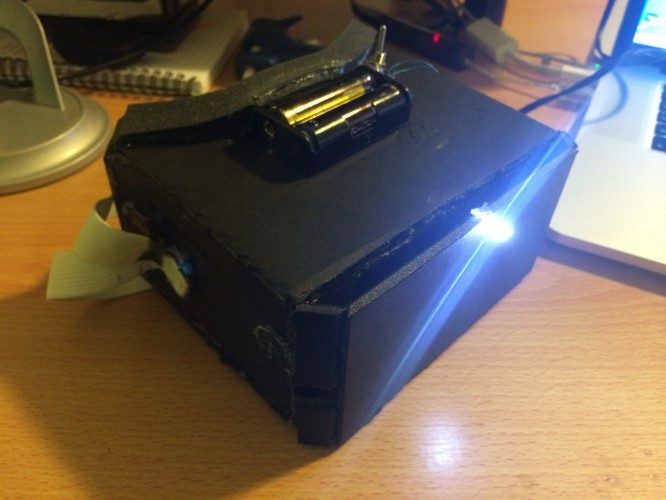
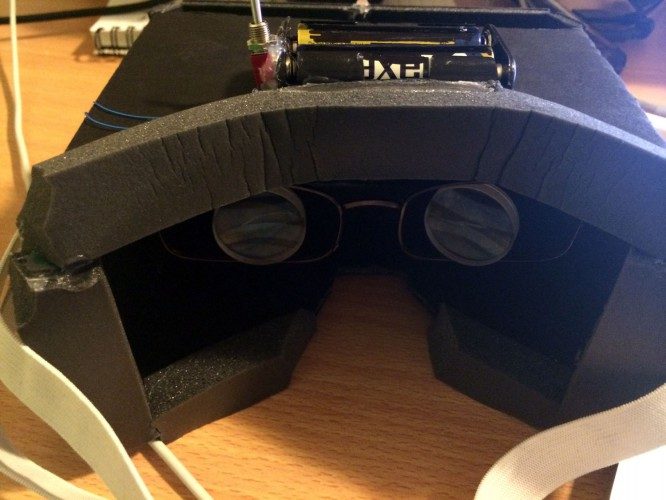
Not everyone can drop a few hundred dollars on a VR headset, but that doesn’t mean they can’t experience VR! For those with the time and a bit of handiwork skill, this DIY guide from guest writer Ohaple will show you how to make a smartphone-based VR headset for as little as $20. Along the way, you’ll learn the hardware and software basics of a VR headset.

1 (1)

Update (1/21/2016): An update to this guide provides new methods for lower latency gameplay using wired display mirroring software and a gyroscopic mouse for headtracking. Check it out here. Original guide continues below.

Virtual reality is on its way into the mainstream. As we see huge shifts such as the Oculus-Facebook buyout and Sony’s Morpheus VR headset prototype, virtual reality is making its way into the hearts and minds of gamers everywhere. One problem still stands between the average consumer and a fun virtual reality experience: cost. Whether you follow a guide to create a DIY Oculus Rift or go out and buy the Oculus Rift DK2, you will find your wallet a few hundred dollars lighter. For those wanting a less expensive way to experience VR, using an existing smartphone for the basis of a VR headset greatly reduces the cost. In this guide, I’ll show you how to make your own smartphone-based VR headset.
2
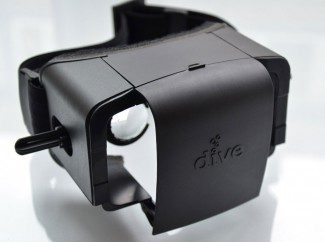
Durovis Dive Smartphone HMD Adapter

This DIY VR headset (also known as a head mounted display or HMD) takes a few hours to setup, and will cost somewhere between $20-$50 depending on how you source your parts and whether you want additional programs or controller support. If you already have a Durovis Dive, or would like to buy one, this project can be used with the Dive as well, just skip to the LED installation portion.

SEE ALSO
Android XR Creates a Major Dilemma That Will Make or Break Meta's XR Ambitions

The Basic Concept:

  • We will build a cheap and easy HMD, similar to the Durovis Dive.
  • We will use our computer to play stereoscopic 3D games. These can include Oculus Rift games, game mods (such as Minecrift), or games compatible with TriDef 3D, which takes 2D games and plays them in stereoscopic 3d.
  • We will then use our iOS or Android device as an external mirrored monitor to view the game in the VR headset.
  • Using an LED, we will establish head-tracking to control your computer’s mouse, and consequently your character’s head position in-game.

1. Measuring and Cutting

Parts and Tools:

  • (1x) Sheet of black foam board
  • Hot glue gun and hot glue
  • (1x) Pair of full metal frame reading glasses (for the frames only)
  • (1x) Pair of magnifying lenses. I used the frontmost lenses from a pair of binoculars ($3 at a thrift store) but if you are going to source them on the net, look for aspheric lenses with 5x magnification and about 1-2 inch diameter.
  • 4 feet of inch wide elastic

Dimension Overview:

First, you need to determine how far your phone will need to sit from your face. Use your lenses to measure about how close the lenses give a good crisp focus. Mine took about 2 and 1/8 inches. This is the distance from your lenses to your display.

3

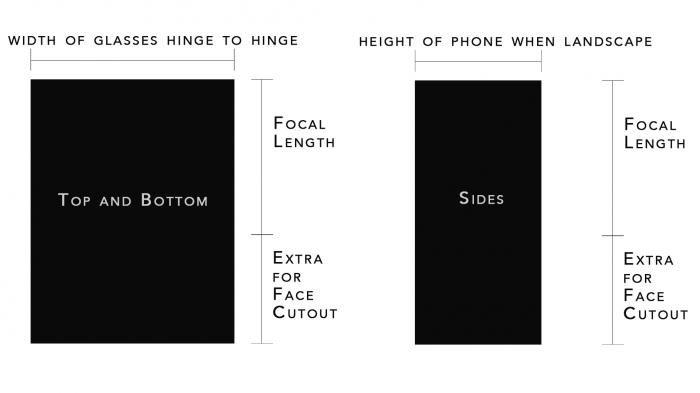
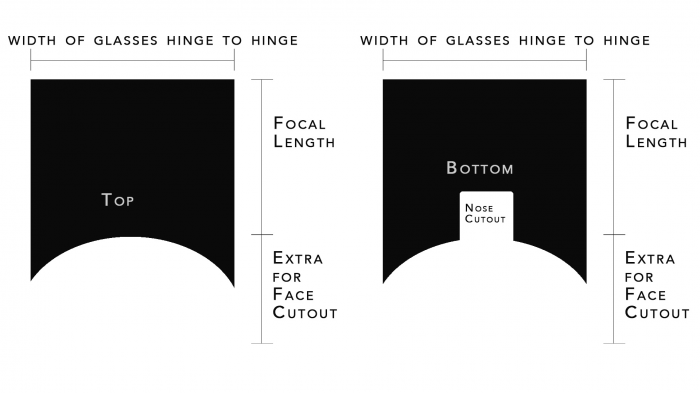
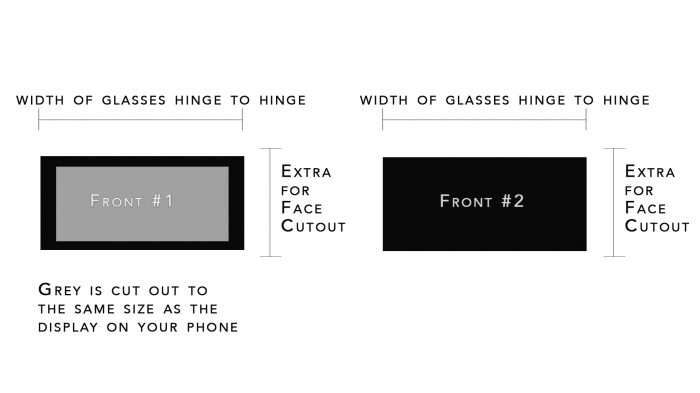
Measure the width of your reading glasses hinge to hinge onto the foam board. This will be the width of your HMD. Now that you have the focal length and the width, cut out 2 pieces of foam board as wide as the glasses, and 1.5x as long as the focal length. This is the top and bottom. of the unit. You can also make the bottom piece 1/4 inch longer than the top, to allow a shelf for the phone to sit on. If you don’t. you can add it as a separate piece later.

SEE ALSO
'Bounce Arcade' is Like VR Pinball for Your Fists—And Exactly the Kind of Creativity VR Needs to Thrive

6

Use a plate, or other round object to draw out a semi-circle on the top and bottom pieces. This is to allow it to fit nicely to your face. On the bottom piece, cut out an extra inch or two in the middle to allow venting under your nose (if you don’t, the lenses will fog when you breathe through your nose).

4

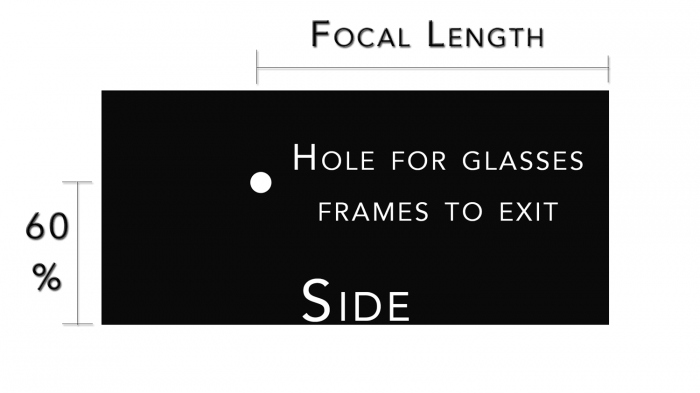
Cut out 2 side pieces. They should both be as long as the top and bottom are (1.5x the focal length), and as tall as the front pieces are (the height of your phone in landscape mode. Mark the focal length on these pieces.

Cut out 2 front pieces. One of them will be solid, used to cover the back of the phone (to prevent false positive light sources from reflections on the gloss back of the phone). This is not needed if the back of your phone is non-reflective, or if you have a non-reflective phone case. The second one will have a hole cut in it the same size as the display of your phone, centered. These should be as wide as the top and bottom, and as tall as your phone is when in landscape mode.

5

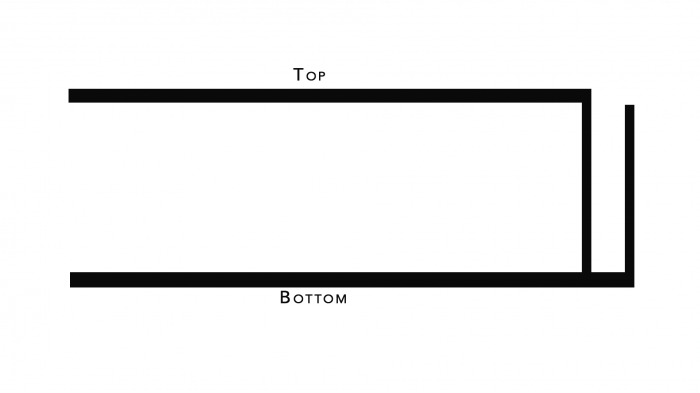
You have all of the foam board cut out to size. Using hot glue, secure the top and bottom to the two sides. Then add the front piece with the cutout, and glue it in place. Make sure that you have left a shelf for the phone to sit on on the bottom piece, or add one now to the very bottom of the unit. This is to prevent your phone falling out the bottom. Glue the second front piece onto the edge of this shelf, making sure there is still room for your phone.

SEE ALSO
Hands-on: 'Metro Awakening' on Quest 3S Brings Snappy Shooting and Smart Scavenging

1 (1)

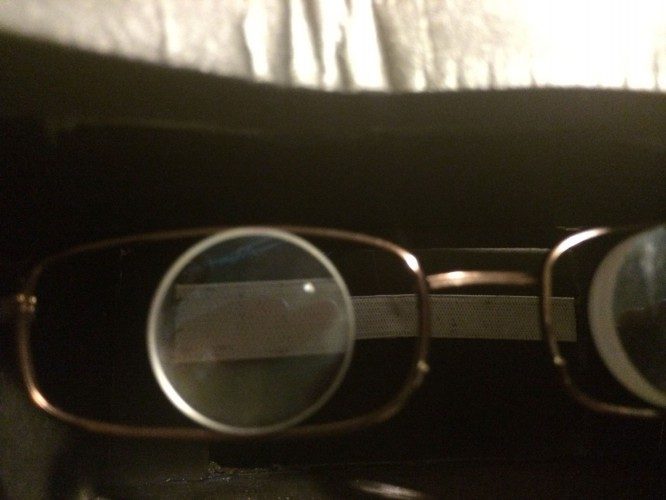
Pull the lenses out of the reading glasses. Pressure fit your new lenses into the frames, and glue in place.

12

Now for the lenses and elastic. Holes should be cut approximately 1/2 way up the side panels, at the focal length of your lenses.

13

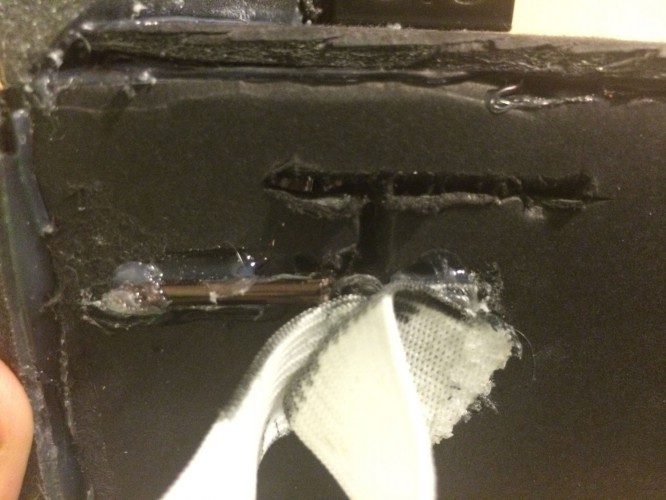
Now cut the glasses at the hinge, and fit them through the two holes. Glue in place.

14

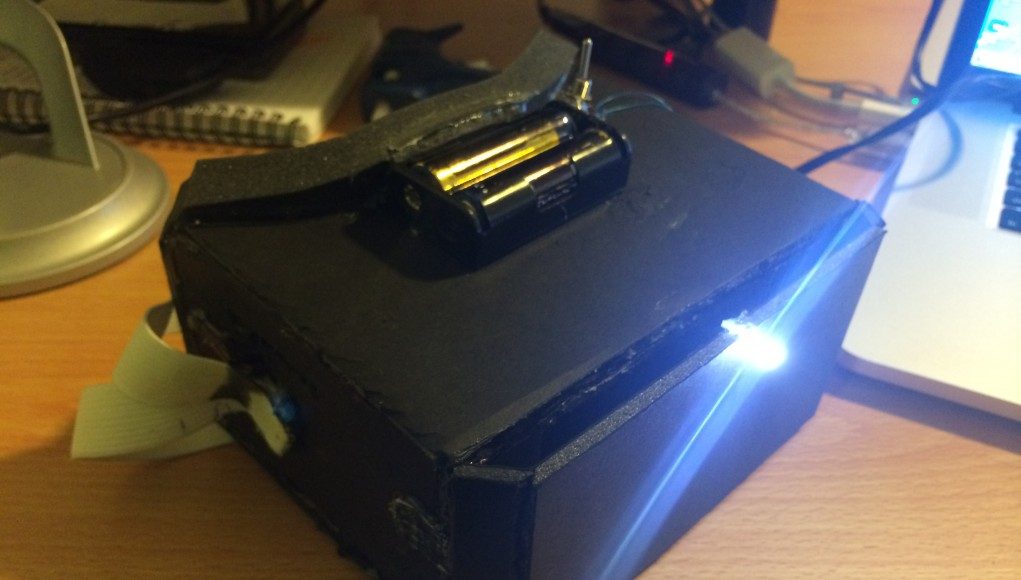
For the phone holder, glue a strip of elastic across the front of the unit. Be sure not to cover up where your phone charges, as you may need to plug in when you play long sessions. For the headstrap, secure a length of elastic to both sides using hot glue. Two strips may be required to hold it secure. You now have your completed HMD. Now to solve head-tracking. Put the phone in the elastic at the front, put it on, and see how it works. Go to the Durovis Dive website where you can find many apps intended for phone only so you can see how it works.

7

Continue reading on page 2…

1
2
3
Newsletter graphic

This article may contain affiliate links. If you click an affiliate link and buy a product we may receive a small commission which helps support the publication. More information.


Ben is the world's most senior professional analyst solely dedicated to the XR industry, having founded Road to VR in 2011—a year before the Oculus Kickstarter sparked a resurgence that led to the modern XR landscape. He has authored more than 3,000 articles chronicling the evolution of the XR industry over more than a decade. With that unique perspective, Ben has been consistently recognized as one of the most influential voices in XR, giving keynotes and joining panel and podcast discussions at key industry events. He is a self-described "journalist and analyst, not evangelist."
  • seanlumly

    This is a wonderful project, and it’s great that there is an exploration into wireless transmission video from a much stronger PC! If latencies can be reduced enough (encode/transmission/decode), or bandwidth increases enough, this may lead to very low cost headsets with great performance. What is most interesting is that cloud-rendering (eg. brigade3.com) suddenly seems much more realistic, and could blow the doors open for realism in VR at easy-to-explore prices.

    Soon VR headsets will be as interchangeable as monitors or TVs. The hardware won’t matter that much with some being better than others. What will matter is the system driving it and the eco-system of software.

    • Ohaple

      Thanks for the nice comment, I agree with much of what you said. I am working right now to reduce latencies, and will have an update on my channel very soon to showcase it!

    • KYOUDA

      please help me
      freetrack can detect my led but when i select mouse emulation and absolute then the mouse just stays in one position help me please

      • Heliosurge

        Has anyone considered using a Wii mote with 2 ir leds? Recall a project for head tracking used that

  • Chris W. Morris

    You could also start with a $50 “Poppy” stereoscopic viewer for smartphones, and just add tracking. B-)

    • Ohaple

      Yeah, that is the idea, in the article I suggest Durovis Dive. I plan to review the Dive in a few days when mine comes, but they are a great company overall. You can certainly modify other units to add tracking. Making your own only saves some cost

  • Alkapwn

    A suggestion for the LED for people who may not want or know how to solder. Get an LED reading light or keychain light from the dollar store. This way you can mount that to the top and still have an on/off switch.

    • Ohaple

      Good idea. I am working on a new design that doesn’t even require an LED, check my channel for more info on it coming soon. Thanks for the feedback

      • braxtron

        why not just use the phone camera’s flash

  • Hec Wilk

    free track doesn’t seem to have a mac version. anything out there like it that works on mac?

    • Ohaple

      Yes sir. The gyroscopic mouse. I have annotated the current video found in the writeup above to include a link to my newer video where I show how to incorporate a USB Gyroscopic mouse. This adds $10-20 to the project cost, but yields a much better result and is mac compatible.

  • Scruff_McGee

    What a cool project! I’m having some success right now with TriDef 3d launching Steam, and then using Android Limelight to use Nvidia’s Shield stream to my Galaxy Note 3. The parts are on the way for the headset, I can’t wait to try to build this, thanks for putting up the instructions man!

    • Ohaple

      Sounds like you have the hang of it! I will be interested to see how it turns out for you. Check my channel for more updates to the project.

  • Hec Wilk

    Just got all my parts in ( using the android gyro-mouse) and all seems to be working except tridef. Can’t figure out what I’m doing wrong. Halo doesn’t work, and team fortress 2 through steam isn’t working. And it only seems to be on games, everything else in tridef works fine. I’m running windows 7 bootcamp on a 2013 Mac mini.

    • Ohaple

      Some people have reported issues using splashtop with tridef 3d if you do not have a Geforce graphics card. Try using kainy in stead of splashtop if you are on android.

  • James Addison

    I am having trouble getting my mouse to move with the led. The program free track won’t let me enable my mouse. Also I am having trouble with the splash program also. I really need help. I’ve built the box and it is awesome with dive games, but that’s all I can play. I’ve made it this far. Help me make it all the way.

    • Ohaple

      Check my channel later today, I have a video that addresses both of your questions. A guide is also being made for roadtovr that updates and improves this project. :)

  • Anibal

    Great job! You are using aspheric lenses? what FOV do you get?

    • Ohaple

      For everyone in the comments, it is much better to contact me on youtube or twitter, as I do not check this as often.

      @Anibal I don’t know how to calculate the FOV, but it seems similar to sitting 12 inches from my 21 inch monitor. I do not know if they are aspheric, as they were taken from binoculars. They do not distort the shapes.

      • CannibalPig

        Im going to try building this project, but i cant seem to find any 5x 1-2″ Lenses anywhere online. Could i just the lenses already in 5x reading glasses, or must i use round magnifier lenses?

  • alberto

    Visit my blog: http://www.virtualystudio.blogspot.com , how make a hmd with a smartphone, i think that use freetrack is the past, 80% of smartphones have gyroscope. Using Freepie application you can move the cursor of windows with the movement of your smartphone.

  • handballnut

    Where do I get those lens things

  • KYOUDA

    please help me
    freetrack can detect my led but when i select mouse emulation and absolute then the mouse just stays in one position help me please

  • MartyMcC

    Hi,
    A few years ago there was a guy called Johnny Lee who got excellent head tracking using a wii remote (check out here: http://youtu.be/Jd3-eiid-Uw?list=UUTW58h2zg8r9O0bGmMt2L5Q ) is there any way this method could be used for head tracking here as i’d say the results would be better than current method?

  • NikeWaffles

    I built the headset, got splashtop and everything, but I have an AMD video card
    as you may know, TRIdef3D only works in full screen (with amd video cards) and Splashtop wont work with fullscreen . And If I use tight VNC Its much too lagy

    With Oculus rift games, I cant look up and down with the Freetrack mouse control.

  • braxtron

    you really want a current limiting resistor in your led circuit, adds minimal complexity and ensures desired brightness, maximum battery life, as well as greatly extends the life of the led. ideally you’d have some sort of dc-dc converter to ensure led brightness throughout the life of the battery, but if you aim for the voltage level at which the batteries are 50% drained or so you should be fine. msg me if you want further deets.

    • Chris Weghorst

      you don´t need one! a simple white LED has a normal working voltage of 3,4Volts at 20mA. since the led only gains 3 volt it will not even burn out or something like that. And to increase the lifetime isn’t necessary, a basic LED will keep up 20.000 hours or way more. about the battery, a basic battery from Duracell or so will contain about 2500mA so they will be empty after 125 hours or so. thats long enough.

      • Clonkex

        Actually you most certainly do need one. Unlike normal incandescent light bulbs, which are voltage-controlled (more voltage = more brightness), LEDs are current-controlled. They will draw as much current as they can regardless of the voltage applied, and if there’s no current-limiting resistor, they’ll draw as much as the battery can supply and burn out very quickly or even instantly.

        tldr; you absolutely do need a current-limiting resistor.

        • Chris Weghorst

          your wrong, trust me, where did you get this information?

          • Clonkex

            Wtf? It’s common knowledge. The only two times you don’t need a series current-limiting resistor with an LED is when the battery itself has sufficient resistance (such as in certain coin-cell battery-powered keychain lights), or if the LED has a built-in resistor (usually to save space on PCBs).

            You need only google any LED how-to or look at Wikipedia to learn this…

            Try simply powering an LED from an unrestricted power source and tell me that it doesn’t instantly burn out.

          • rg33

            I had always used a resistor with LEDs, so I just tried an experiment, feeding 3v to a white LED with no resistor while measuring the current using a voltage & current controlled power supply. If the voltage was between 2.75v and 3.0v, the LED drew a limited amount of current (~15ma), but as the voltage increased above 3.1v, the current climbed dramatically.

            At 3.3v it almost doubled to 35ma. At 3.5v it almost doubled again to 60ma.!

            I inserted a 200ohm resistor at 3.3v and it fell to only 3ma. Brightness was still good, and battery life would soar. It also stayed below 10ma even feeding 5v to it. (5v w/o resistor gobbled as much as 100ma.)

            Conclusion, if your battery voltage stays below 3v, current isn’t bad, but battery life will be significantly shorter than with a resistor.

            As far as LED life is concerned, it lasted at least an hour of testing! :-)

          • Clonkex

            Interesting! So it seems that you _can_ use an LED without a resistor, but it depends greatly on the particular LED and battery you have (i.e. the inherent resistance of the battery), and relies on very specific voltages.

            In my previous tests of running LEDs without resistors (at 5v), some of them just flickered once and died, and others burned extremely brightly for a second or so then died. Never thought to take it further and try lower voltages.

          • sorbustenherra

            In 99% of cases you should still use a resistor for this kind of circuits. You are essentially creating a short circuit if you just strap a led onto a battery without a resistor :D

          • Clonkex

            Exactly.

          • Gamie1543

            both right i have some 9v leds here you could just connect to 9v battery they come in different voltages

  • Bla

    u can use kinoconsol. Ten time better than running through splash top and actually made for streaming pc games to a smartphone for VR