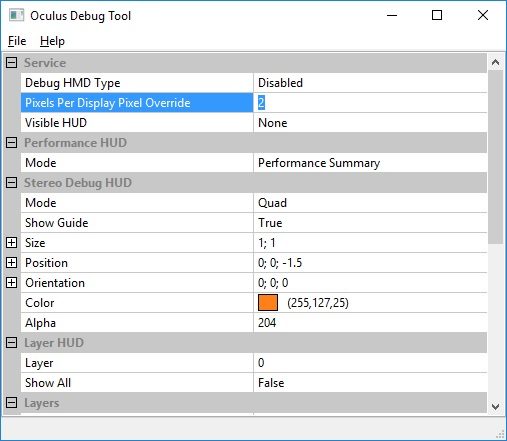
Tired of jumbo pixels muddling in-game detail on your Rift games? Wish there was a way to boost detail even on VR titles with no options? Then the Oculus Debug tool may just be your saviour, as long as you have a PC that can handle it.

Update (2/7/17): If you’re using your Rift with SteamVR, this free utility makes supersampling easy.

If you’re packing a PC with some reserve power and want a way to significantly improve image quality during your time in VR and your chosen game doesn’t include any options that help, we have a solution for you.

As part of the Oculus SDK (Software Development Kit), Oculus ship a handy tool which allows devs to throw extra information to help them troubleshoot performance issues or glitches and control runtime rendering elements like compositor layers etc. But one of the options also allows them to increase the running game’s pixel density, that is, the resolution the game is rendered at before being down-sampled and sent to the Oculus Rift display.

See Also: ‘Edge of Nowhere’ Review

The tool allows you to increase said pixel density, and supports incremental values in between, with a setting of ‘2’ quadrupling the pixels your VR gaming PC has to render. This is effectively a form of super-sampling, a particularly expensive form of anti-aliasing that also happens to produce excellent image quality. But for games that offer minimal graphical options, and assuming you have the GPU grunt to push more pixels and maintain that hallowed 90FPS.

For the purposes of gauging image quality when compiling this very quick walk-through, we used the recently released Edge of Nowhere from Insomniac Games, a very pretty title which, sadly includes zero options to tweak in-game pixel density. The difference between the lowest and highest settings make to this game are pretty impressive – really allowing the production design detail shine through.

SEE ALSO
Meta Opens First Ray-Ban Pop-up Store in Hopes of Making Smartglasses Fashionable

How to Run the Oculus Debug Tool to Improve Image Quality

  • 1) Download the latest Oculus SDK from here and install.
  • 2) Close any running instance of Oculus Home and / or Rift games you may be running.
  • 3) Open Oculus Home again first, before anything else.
  • 4) Now open the Oculus Debug tool before launching any games.
  • 5) Set only the ‘Pixels Per Display Pixel Override’ option to a value of your choosing between 1.0 and 2.0 (no need to search for an ‘apply’ button – once the value is changed it should be active.
  • 6) Launch your game of choice from within Oculus Home and enjoy the sharper image and revealed in-game detail.
  • 7) Close the Oculus Debug Tool (this should fix any stuttering, according to reader feedback)

For every subsequent game you want to plat, open the debug tool first and set the value once again.

oculus-debug-toolUntitled

It’s important to follow the above steps precisely on your initial run, as doing it in a different order can cause severe stuttering, which you might put down to performance issues but in fact is just ‘how it works’. If you do see this, retry the above procedure and you may be surprised at the results.

We tested Edge of Nowhere with our Road to VR Exemplar gaming PC, which packs a Nvidia Geforce GTX 980ti, and managed to push a pixel density of 1.8 before frame rate became an issue and it was obvious Asynchronous Time Warp was working beyond its limits (jerky animation and skipped frames). The resulting difference in image is obvious however, with subtle texturing and shader effects revealed and far less distracting image artifacts on distant objects – it looked closer to how you imagine the artists envisaged it.

SEE ALSO
Elijah Wood Revealed as the Voice of Scarecrow in 'Batman: Arkham Shadow', Coming to Quest 3

As far as we can tell, the debug tool overrides any in-game pixel density settings, so titles like Chronos and EVE: Valkyrie which allow you to tweak this, should simply adopt the Oculus Debug Tool setting. However, we haven’t tested this extensively, your mileage may vary and that goes for title compatibility too. Give it a shot and let us know how you get on in the comments below.

road-to-vr-exemplar-ultimate-by-avaWe partnered with AVA Direct to create the Exemplar Ultimate, our high-end VR hardware reference point against which we perform our tests and reviews. Exemplar is designed to push virtual reality experiences above and beyond what’s possible with systems built to lesser recommended VR specifications.

Newsletter graphic

This article may contain affiliate links. If you click an affiliate link and buy a product we may receive a small commission which helps support the publication. More information.


Based in the UK, Paul has been immersed in interactive entertainment for the best part of 27 years and has followed advances in gaming with a passionate fervour. His obsession with graphical fidelity over the years has had him branded a ‘graphics whore’ (which he views as the highest compliment) more than once and he holds a particular candle for the dream of the ultimate immersive gaming experience. Having followed and been disappointed by the original VR explosion of the 90s, he then founded RiftVR.com to follow the new and exciting prospect of the rebirth of VR in products like the Oculus Rift. Paul joined forces with Ben to help build the new Road to VR in preparation for what he sees as VR’s coming of age over the next few years.
  • Simon Therrien

    Prior to that, there was some projects (like Henry and Lost for instance) made with unreal which allows us to boost this (called the screenpercentage) with a .ini file (or from the console if the game allows it — ex: hdm sp 200 )

    • Vince Stimpson

      In our game “Kismet” the primary difference between each quality setting is resolution. We used this same function to increase fidelity. Vive uses a similar function called r.screenpercentage. The difference between 100 and 150% screen percentage is astounding. In fact, Oculus is set to 150% in Unreal by default, as 100% looks like garbage. Even higher resolutions look great but after 175-200% there is no appreciable difference. It’s very tricky. As a developer, we aren’t targeting 2160×1200 at 90fps. We are targeting 3240×1800 at 90fps, minimum. Our hidden “Uber” quality setting which requires at least a 980ti, is rendering at 4320×2400 at 90fps – Nearly a billion pixels per second! On a 4k on a monitor our game will run at 120fps with a 980ti. Imagine any other game running at those resolutions and speed. This is why it’s so difficult to get high quality visuals. I spent weeks getting Kismet to run on minimum spec machines without sacrificing visual quality. Thankfully the Unreal devs at Epic are taking VR seriously and new render optimizations are frequent. Those guys are the best!

      • Simon Therrien

        Baking AO into lightmaps instead of rendering at runtime and limiting dynamic shadows to only a few meshes helps alot.. Idem for the lod batching tool from Unreal, which allows to significantly reduce the numbers of drawcalls.
        For my project, Screenpercentage at 160 seems to be the sweet spot..

        • Vince Stimpson

          Lighting channels is one of my favorite new features. Have you experimented with Oculus’ own “forward rendering” pipeline? I would miss all the fancy deferred features, but the performance boost with MSAA is enticing. I haven’t given it a shot yet.

          • Simon Therrien

            Didnt need to switch so far.. I have plenty of culling in my scenes so the perfs was fine enough. Still, its far from over so maybe Ill have to give it a try sometime soon..

      • ZenInsight

        Wow. Great information. Thanks!

      • Kristopher

        This is interesting when I bump Kismet up to 1.5 or 2 I can only get about 30 FPS I’m running a water cooled overclocked 980ti. Honestly Kismet is probably the worst experience I’ve had when using this trick.

        • Vince Stimpson

          You actually don’t need to use the debug trick to run higher resolutions in Kismet. All you have to do is launch the game normally and press 1-4 on the keyboard while in game. 1 is the lowest quality setting and 4 is the highest. You should see the quality difference immediately. I haven’t tired the Oculus debug resolution trick myself. I’m not sure how well it interacts with our game. With an overclocked 980ti, you should have no problem running our highest built in quality setting. Just make sure the debugging tool is turned off or is set to default settings.

    • Maria da Cunha

      Where is the “Oculus Debug tool” ? I do not know where to look…

      • Simon Therrien

        Have you udpated the sdk? (link in the article)
        If so, go to the tools directory of the Oculus SDK and select ” OculusDebugTool.exe ”

        • zach

          there is no debug tool in the latest download

  • Jonathan Parsons

    out of curiosity what was the system spec you used? (…yes I know you provided a link, but the specs at the end of that link do not match your own comments…) I’m curious to see how much I might be able to push my own system. (i7-4930k and a GTX 980ti)

    • Thomas Birkinbine

      Hello everyone. These articles can be frustrating because they are so short and don’t answer questions us “normal” computer dudes don’t understand.

      1 – I followed the steps with the debug took and changed it to 1.8. Then it doesn’t “save.” Do I just close the debug tool and it keeps it at 1.8? When I close and re open it goes back to 0.

      2 – How do I launch the game? From the debug tool? Do I leave the tool open once I change it to 1.8 and then, while it is open, go to oculus home to launch a game?

      3 – What about games I have in VR from steam? Can I use the debug tool and then launch Subnuatica from steam or does it HAVE to be in Oculus home?

      Thanks in advance,

      • Elliot Maldonado

        How to Run the Oculus Debug Tool to Improve Image Quality

        1) Download the latest Oculus SDK from here and install.
        2) Close any running instance of Oculus Home and / or Rift games you may be running.
        3) Open Oculus Home again first, before anything else.
        4) Now open the Oculus Debug tool before launching any games.
        5) Set only the ‘Pixels Per Display Pixel Override’ option to a
        value of your choosing between 1.0 and 2.0 (no need to search for an
        ‘apply’ button – once the value is changed it should be active.
        6) Launch your game of choice from within Oculus Home and enjoy the sharper image and revealed in-game detail.
        7) Close the Oculus Debug Tool (this should fix any stuttering, according to reader feedback)

        For every subsequent game you want to play, open the debug tool first and set the value once again.

  • Ian Shook
  • Zach Mauch

    Any vive equivalent for this? I’ll be excited to try it when I upgrade my 970 too 1070.

  • ummm…

    so this makes it 4K? lol.

    • Robin

      naa.

  • calderes

    This helps a lot with chronos since unlike edge of nowhere your character can move further into the distance where SDE is much worse. Unfortunately I get stuttering past 1.3 on the debug settings (with chronos). But wow does 2.0 look great. I have a 980ti and 4790k. I’ll have to crank up the settings in EoNowhere. I started conservatively at 1.3. Ran great and looked really nice.

  • Jason Evangelho

    This is incredible, it REALLY does make a difference.

    • ZenInsight

      Would love to see some side by side images….

  • Jason Evangelho

    I was able to push it to 1.5 in Edge of Nowhere (with a GTX 1080) before it even dropped below 90fps. It looked REALLY good.

    • Andy Ainsworth

      Have you tried closing the debug tool once the game is launched, seems to increase the performance a lot without loosing the pixel increase, not grabbed Edge of Nowhere yet but I’ve been using 2 on everything with only a 980

      • Jason Evangelho

        No but I’ll definitely give it a shot, thanks!

      • Nads

        Im not 100% sure but i think the reason why performance is coming back to good for you after you close the debug tool is because the setting is being reset back to 0.

        After you close it, reopen the tool again and you will see that your changes have been reset.

  • Michael Quiroz

    Are there any recommended settings for different GPUs for each game? Or are we still in the trial by fire stage? Running a 980 and love to get any feedback from the community on what the magic number is for most games.

  • ra51

    So how does this exactly work? We set the Pixels Per Display Pixel Override value, then leave the debug tool running and launch a game from Oculus Home directly?

    • Andy Ainsworth

      I’ve been doing this for a few weeks, Open Oculus home, open the debug tool and set the value, I use 2 pretty much with anything, then I launch the game, typically see some stuttering at this point, I then just alt tab back to the debug tool and close it. Seems to preserve the pixel override and the stuttering goes away when the tool is closed. The process has to be repeated for each game launch, I usually quit Oculus home in between too. Bit annoying but so worth it. I’ve also had success with playing side loaded games/experiences like Sensa Peso for example looked a million times better after, and some steam rift games too.

      • Mane Vr

        thank this is just what I needed to know just waiting on my Oculus to ship but wanted to know what to do when it get here

  • Jonathan Parsons

    Got mine up to 1.6 before i could notice any effect on latency or frame rate, and MAN what a difference in image quality! (Now the debug tool did register a performance hit, I just visually could not see it) Elite Dangerous just got better. Oh… My system is a I7 4930 and a 980 ti….. I cannot recomend this mod enough!

  • augieray

    Didn’t seem to make any difference for me. After changing the Pixels Per Display Pixel Override, do I have to do anything? I don’t see an “apply” button. Keep the Debugging Tool running? Close it?

    Also of note: You indicate the setting can go between 1 and 2, but mine was at 0 on open and I seem to be able to stick any number in there. I entered 200 and it accepted it.

    • TheMCPowerz

      Try closing Oculus Home, and restarting it. The settings should apply. The difference in clarity was huge, but since I have a 970 I felt the FPS dropped a little.

  • Jerry

    I’m not technically minded, so this may not be the smartest question in the world, but let me please ask: would this image enhancement work when watching films as opposed to gaming? Thanks!

    • Zoide

      That’s actually a very good question. Has anyone tried it with Oculus VIdeo?

  • RoJoyInc

    There is a game I’m alpha testing called CDF STARFRIGHTER. It has this build in. You can select the res and the image BOOST. I run it about +180 for VIVE. It sharpens dramatically. Though over 180 starts to hitter. The game has the same options for VIVE and RIFT.

  • Morye Kim

    Anyone using 970 and try using this tool? I wonder if I can get the pixels upto 1.5.

    • Franz

      I’m on a 970/i5 and was able to get up to 1.4 on Edge of Darkness. I put it to 2.0 for Chronos just for fun and it looked sooooo good. Unfortunately, there was too much stuttering and lag but if you stayed still, you could see all the amazing detail.

    • I set Elite Dangerous to Medium Quality and pixels to 1.5 – works without stuttering, even inside stations.

  • ZenInsight

    Reposting example:

    https://docs.unrealengine.com/latest/INT/Resources/ContentExamples/PostProcessing/1_13/

    If anyone has any in game shots would be nice to post comparisons.

  • Mane Vr

    does the setting holds or do I need to do this before every game and should I close the debugging tool before starting the game?

  • V de Jong

    This also works for unity?

  • John Leonard

    This worked great. I think you need to leave the debug tool open. I am going to try other games but this tweet worked wonders!!!

    • U don´t need to, unless you restart the oculus service or reboot your pc it has the last set config in the debug tool

  • MowTin

    What if your game is not on Oculus home? How do you launch steam games?

    • Zoide

      Same thing. You open the debug tool, set the pixels per display and press Enter. Then you open the game from Steam. I tried it with Assetto Corsa and it worked great.

      Follow these steps: http://www.riftracer.co.uk/guides/assetto-corsa-oculus-rift-setup

      • Bart Zuccala

        How do I get to a steam game when I’m inside the rift?

        • just start a VR Capable game in steam

  • Luc

    I have a 970 (and 4670k) and was thinking of upgrading to a 1070 to be able to use this. I tried even 1.6 on Eve and frames were dropping to 45/s. I noticed you need to wait until past the start screen before closing the toolkit otherwise the parameter will not change. Waiting for people to post more review on their experience with the 1070.

    • Zoide

      I tried it with Eve: Valkyrie on 2.0 with my 1070 and it was dropping frames like crazy with the Eve resolution set to 135%. 1.5 works much better, allowing it to just barely maintain 90 fps while in space (though dropping a lot to ~45 fps while taking off from the launch tube at the beginning).

  • Carlos

    So i’ve tried this but i dont see any difference, im using a 1080 so i thought i would notice right away..
    it says “Install Oculus SDK” but is a rar
    Right now i have the OculusSDK folder in my desktop, do i have to put it inside Oculus folder or doesnt matter where it is?

    • Buddydudeguy

      Un zip it.

  • Shepard

    There are 2 steps missing in above article. With oculus home open, if you run the debugger and set the pixel ratio to 2 or whatever your PC can handle, your head tracking will go all wacky. You have to close the debug tool after setting ratio, this will fix the tracking in oculus home, while keeping your set pixel ratio, then run the debug tool again and set the ratio to 2 or whatever. Next, you run the game, and it will use the new pixel ratio. The above will tax your GPU very heavily, so unless you have 980, or even better – 1070 (at least), you better wait until you can get a better GPU.

    The real visible difference in oculus home, is that image becomes much clearer than without this trick, you will not see much higher res, since you are still limited by the resolution of the a displays. There will still be a “net” of pixels in all the games and oculus home itself.

    In addition to above trick, if you have at least GTX 1070, you can also set custom resolution in your GPU settings, something like 1920×1440 and then run the game in that resolution. I tried this all with Mass Effect 3. Picture quality is amazing, but I still see “pixel net” due to retina displays. No tricks will get rid of that, until oculus releases CV2-3 with higher res retina displays.

  • Shepard

    this trick doesn’t seem to be working any longer. Oculus must have changed something…

  • Buddydudeguy

    Do you have to do this every time you launch a game there after, or only once to set?

    • Everytime, asked the same question and found the answer in the article after reading twice :)

  • Ionut Manea

    Guys, there is something I miss? I followed tge steps from above exactly as is written, but I have no image improve at all. I have 1080 video card, even if I set the 2 value there is no difference in quality nor in performance. The development tool is somehow out of date for the current version of Oculus Home? There is any other trick? I bought the Oculus yesterday and is not possible to use for more then 10 min due to low resolution problem. Please help me with this, thank you.

    • I noticed that the settings changed when I restarted the oculus service, before running the steps.Try that one

  • Does it save the setting for each game or do you have to perform each step every time you play a game again ?

    • Ok, you wrote it in the articel XD my bad :)

  • Jonathan Smith

    crashes no matter what setting I change? any ideas?
    i7-5820x gtx980ti

  • Jonathan Smith

    crashes no matter what setting I change? any ideas?

    i7-5820x gtx980ti

    ANYONE…..?

  • Shawn Genoway

    A note to say thank you! I was beginning to question my Oculus Rift purchase given the jumbo pixels. A setting of 2 as recommended gave me the clarity plus it is simply a more immersive experience without the jumbo pixels. There are a couple of mentions of having to do this before playing every game but I haven’t had that experience so far. Pixel Per Display Pixel Override remains at 2 even after I exit both Oculus and the SDK and then reopen both. I am seeing this improvement across my games, 360 videos, 360 photos, animations, etc. I am running NVIDIA GeForce GTX 1070. Again, thank you.

  • NoNonsense74

    I initially sold off my Oculus due to this issue. Just bought it again on sale for 399 (with controllers). Praying this trick does it !!!!! you guys are the best ! I have a 1080TI, push it baby !!!………

  • Jason Seiler

    The provided link does not go to any download for the SDK or the debug tool, just the documentation for the debug tool

    Does this even work anymore?

  • Morality_Mortality

    I’m using 1.4 supersampling in Onward to great success ! However, every once in awhile (say 1 out of every 5 times) the match starts up but I’m stuck at 1-2 fps (or less) for up to 30 seconds until it sorts itself out then I’m back to 60-75 fps for rest of match. I’m willing to put up with this for all the extra detail, color, and sharpness the supersampling provides.

  • Germz

    All I noticed was this: changed number from 1 to 1.5 – slight change in performance , no change in game visuals. Changed from 1.5 to 2.: no difference in resolution, little more of a change to performance but no change to resolution in the game what so ever. I got crazy and changed it to 8. Oculus would not start. Dropped it down to 5 and it started Drastic negative changes in performance with absolutely no difference in resolution what so ever. The more I think about this, the more I keep coming to the conclusion that ….. well to give a poor example, lets say you have a 720 TV and you change the resolution on the cablebox to 1080. you will not notice any difference because the tv does not support 1080. Better yet, lets change it to 4k. BIG difference in FPS and how the game is going to run but you will not see a single difference in resolution. You can not overcome hardware resolution with software EVER in this type of circumstance unless the oculus is cable able of much higher resolution and is being governed or choked by software. Any Ideas?
    2 X Nvidia Geforce GTX (&) OC with MCI SLI SPECIAL CARDS! 04g-p4-2974-b5 (x2) Bother water cooled to apply max voltage while staying at a max temp (being h20 cooled.. I am sure you know what that means) Killer E2400 Gigi Ethernet Cont. I7-6700k but I see no point in OC’n them. Extra card for USB 3.0 controller for 3 sensors without crashing into E.O. bandwith. (AsMedia USB 3.1 and 3.0 extensible Host controller for sensor 1 and sensor 2. Fresco Logic USB HUB extensible Host Controller for other sensor) So 1 sensor running via USB 3.0 cable into 3.1 with seperated controler, 1 sensor running on seperate hardware card and seperate USB 3.0 controller. and last sensor (3 total) running in last unused USB 3.0 controller. Then headset plugged via HDMI into main 970 nvidia and usb3.0 is plugged via aftermarket USB 3.0 controller.

  • One-Eye

    So you close the app after you have launched the game? Did I read that right?