7. Check a Game’s Comfort Rating Before You Buy
Your comfort in VR can vary drastically from one game to the next. Generally this is related to how much artificial motion an app employs. Games like Beat Saber—where you only stand in one place—tend to be comfortable for almost everyone, while games like Warplanes: WW1 Fighters—which have you twisting and turning in an airplane—can be uncomfortable for some.
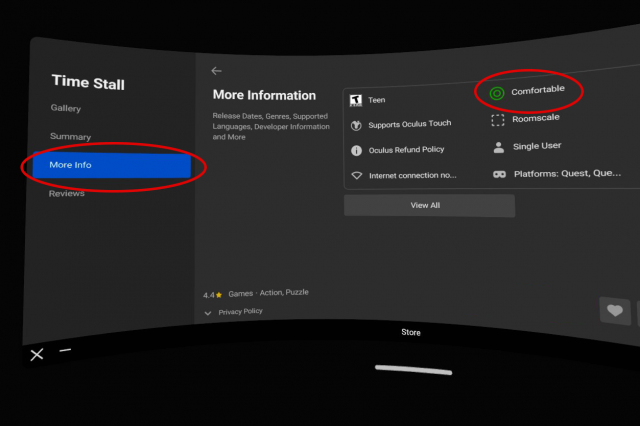
Luckily every app in the Oculus store has one of three comfort ratings:
- Comfortable – appropriate for most people
- Moderate – appropriate for many but certainly not everyone
- Intense – not appropriate for most people, especially people new to VR
You can find an app’s comfort rating in the ‘More Info’ section of the app page in the headset, or in the sidebar of the app page if you’re browsing the store through a web browser.
If you’re brand new to VR, we highly recommend you start with ‘Comfortable’ experiences before moving on to trying ‘Moderate’, and only then, ‘Intense’. This will give you a good feeling for what kind of VR experiences are comfortable for you and which might not be. Comfort in VR varies significantly from person-to-person and app-to-app, so don’t feel like there’s anything wrong with you if some games make you dizzy.
8. Know the Oculus Store Return Policy
If for any reason you aren’t satisfied with your purchase from the Oculus store, there is a straightforward return policy. You can return any app provided the following two conditions are met:
- It is less than 14 days since your purchase
- You have used the app for less than two hours
This is especially useful if you buy a game that you find you can’t play comfortably.
How to Refund an Oculus Game
Using the Oculus smartphone app:
- Tap your profile icon at the top left
- Tap Purchase History
- Tap the app in question and choose ‘Request Refund’
9. Check Your Privacy Settings

Oculus is Facebook company and all Quest 2 users are required to sign in with a Facebook account in order to use the headset.
It’s a worthwhile exercise to double check your privacy settings so that you understand how your activity in the headset is seen by others. You can easily access the settings in the Oculus Privacy Center.
Here’s the settings you can control and what each does:
- Who will see your activity on Oculus?
- This controls how your current activity in VR is displayed on your profile (like which app you’re using). If you don’t want anyone to know what you’re currently up to in VR, change this to ‘Only Me’.
- Who can see your friends list on Oculus?
- This controls who can see the people you are friends with through your Oculus profile. If you don’t want anyone to see who your VR friends are, change this to ‘Only Me’.
- Who will see your Facebook name on Oculus?
- This controls which name people will see associated with your Oculus profile. Depending upon your setting, people may see your Oculus username or the first and last name of your Facebook profile. This also controls whether or not people can search for your Oculus profile by your Facebook name. If you don’t want anyone to see your real name in VR or be able to find your Oculus profile with your real name, change this to ‘Only Me’.
You can also see much of the data that Facebook collects about your VR activity; it’s worth browsing through this info to understand what kind of information is being stored about your activity in VR. To see the info, browse to the View Your Information section of the Oculus Privacy Center.
Got more useful tips and tricks to share with new Quest 2 users? Drop them in the comments below!


